Quantcast
Channel: Laser Cutting Tutorial – Ponoko
Viewing all 82 articles
Browse latest View live

Remove Double-Lines in Inkscape

$
0
0

Saving yourself making time and cost

As many of you will know, you can save making time and cost by placing the pieces you want to cut directly side-by-side. This way the two pieces can share a cutting line between them – effectively cutting two sides in one stroke.

The trick to making this work, however, is the removal of the unneeded extra line. When you first place the objects directly side by side, you should be able to see the shared line as being a darker blue to the others – at this point it’s a double line – one blue line directly on top of the other.

Removing this extra line in Illustrator is straightforward, but in Inkscape it’s a bit more complex:

Before you begin: Select All and use the Path > Object to Path command.

Step 1: Select the Edit Paths by Nodes tool.

Step 2: Click on an object that contains a double line and then select a node on one side of the double line to be removed.

Step 3: With the node highlighted dark gray, click the Break Path at Selected Nodes button

Step 4: Click on the node on the other side of the double line, and use the Break Path button again.

Step 5: Click on the line between the two nodes so that both nodes are highlighted dark gray and a larger size to the rest of the nodes in the object, and press delete. A paler blue line should be left behind.

Step 6: Select the nodes on each side of the next line, and repeat the above process.

As I said, it’s a bit complex, but once you get the hang of it it will work for you. If anyone has any questions, or anything here is unclear, just let me know and I will continue to refine these instructions as needed.

Thanks!


How to make snug joints in Acrylic.

$
0
0

The importance of radii

We’ve written about using ‘nodes’ with 3D objects made from wood before, but suggested it may not work for acrylic because it is more brittle and less forgiving.

However, after working with Drownspire to develop their Vambit toy into a product we could give away at Makerfaire, I discovered that you can successfully use nodes when making with acrylic.

There are, however, some tricks to it.

Firstly the nodes need to be a bit smaller <0.15mm/0.006″ on each side. This means it wont cover the same range as in wood but still a good option.

Second, how you treat the end of the slot is the key. If you have a sharp corner, typical in a laser cut slot, the acrylic will always fracture at that corner. See this example.

Effectively a sharp corner is creating a weak point in the acrylic. Not good when this is structurally an important part of the design. A small radii in that corner does wonders to transfer the forces from one face of the hole or slot to the other and reduces the risk of the material splitting at the corner.

The larger the radii the stronger it will be so you will need to make an aesthetic decision on how big you can go. On the Vambit the radii was tiny, 0.26mm and it was enough to make a noticeable difference. I would aim for 0.5mm and greater if your design will allow it.

Another trick to keep in mind is putting the nodes on a part of the design where you can guarantee the length. That way you don’t need to bet on the thickness changing and the range of variation is a lot smaller. This occurs when you have 2 edges that are cut by the laser that are the friction edges. This works if you are using tabs but is not necessarily the case if you are using a slotting joint.

For example, in the design of this spinning top I put the nodes on the tab as opposed to on the slot.

The tabs on the triangle parts fit into the slots on the circle part. Dimension X and Y will be the same each time as cut by the laser therefore I put the nodes on these parts. Had I put the nodes on the slot for the handle (as in diagram below), the friction points would be against the surface of the material, a part that can vary if the thickness varies.

An alternative joint is the t-slot joint which is popular with people who make more engineering type products. This joint uses tabs to locate pieces then a t shaped slot with a captive nut. This type of joint is great. You can slightly oversize the holes to allow for oversized material and the bolt will hold it snug together. If you use the radii on the corners of the cut outs you greatly reduce the risk of cracking the acrylic by over tightening the bolt.

If you want to go another step, rubber washers can also reduce the chance of over tightening and maintain tension in the blot so it wont come undone through vibrations etc.I hope these tips will help you with your next project, or perhaps to finalize a design you’re working on.

We’ll be interested to hear you’re experiences using radii too, and any other advice you might have for people wanting to make 3D designs using acrylic. Let us know below!

A How-To for Toothy Wheels

$
0
0

Make your own gears with Ponoko

The MAKE blog recently featured a guest post from brainy, bad-ass Dustyn Roberts on making your own gears. The article includes step-by-step instructions for using Inkscape to design your gears and using Ponoko to have your designs made.

For those of you who have always wanted to try out Ponoko but don’t know where to start, a simple project like this is a great way to get a feel for the process. And even if you don’t have a need right now for laser-cut gears, you’ll have a pretty cool coaster. : )

via MAKE

How to combine shapes in Illustrator for laser cutting with Ponoko

$
0
0

The right way, and the wrong way

In this short tutorial, I’ll show you how to combine shapes in Illustrator to create single vector objects for laser cutting with Ponoko.

Below is a transcript of the video:

Hi – this is Josh from Ponoko – and today I want to show you how to combine shapes in Illustrator for laser cutting with Ponoko.

To do this, we’ll be using three key menu commands:

  • the first is Object > Group
  • the second is Effect > Pathfinder > Add
  • and the third is Object > Expand Appearance

Before we look at this process in greater detail, lets check out an example of shapes in Illustrator which have been combined incorrectly for laser cutting with Ponoko.

At first glance, this looks perfect for laser cutting. There is a thin blue line which traces around the letters on the top, and a rectangular base on the bottom. However – if we use the Select > All command – you can see that all is not what it seems.

Another way to look at what is really in this file is to use the View > Outline command. This reveals the true vector content of a file – and lets us know what will actually be made. In this case, what it has revealed is that these letters and this rectangle are not truly connected.

What I have done instead is place white fills over the blue lines in my design that I do not want cut out – which unfortunately would not have worked. When it comes to cutting lines and vector engraving lines, the laser cutter will cut or engrave them anywhere they are present in the design – even if they are covered by something else. The white fills I placed over these cutting lines would be ignored, and the lines underneath them would still be cut.

So let’s combine these shapes correctly.

The first thing we do is select all of the shapes we want to combine together. We then use the Object > Group command – which most of you will have used before.

Next is the Effect > Pathfinder > Add command. The Pathfinder effect lets you create new shapes out of overlapping objects – which is exactly what we want.

Finally, we use the Object > Expand Appearance command to turn the pathfinder effect into true vector information. Leaving out this step would be the same as using white fills to cover the lines.

Now when we use the Select > All command, there is nothing highlighted between the pieces we wanted to combine. We can also change to View > Outline, and see that these letters and the rectangle below are truly a single vector object. Once again, this a true representation of what will be laser cut – and this time it’s what we want.

Let’s go through this process one last time. We’ll open a new Ponoko template – and create a collection of overlapping shapes which are formatted for laser cutting with Ponoko…

So now we have something vaguely arty – let’s turn it into a single object for laser cutting. First, we’ll select all the shapes that we’ve laid over each other. Now we use the Object > Group command, the Effect > Pathfinder > Add command, and the Object > Expand Appearance command.

All of these shapes have now been combined into a single object ready for laser cutting with Ponoko. We’ll do a final double check by using the View > Outline command, and it’s definitely correct.

So that’s all there is to it. I hope this technique might be helpful to you in the future – for making new exciting projects with Ponoko.

Thanks!

How to combine shapes in *Inkscape* for laser cutting with Ponoko

$
0
0

In three easy steps

Two weeks ago I posted a video tutorial for combining shapes in Illustrator for laser cutting, and I wanted to make sure that our large number of Inkscape users had the same technique available to them…

If you’ve watched the Illustrator video, you may experience a sense of deja vu – the main difference here in what commands to use in Inkscape, and where they can be found.

Below is a transcript of the video:

Hi – this is Josh from Ponoko – and today I want to show you how to combine shapes in Inkscape for laser cutting.

To do this, we’ll be using two key menu commands:

* the first is Path > Combine
* the second is Path > Union

Before we look at this process in greater detail, lets check out an example of shapes in Illustrator which have been combined incorrectly for laser cutting with Ponoko.

At first glance, this looks perfect for laser cutting. There is a thin blue line which traces around the letters on the top, and a rectangular base on the bottom. However – if we change our view mode using View > Display Mode > Outline – you can see that all is not what it seems.

This ‘Outline View’ reveals the true vector content of a file – and lets us know what will actually be made. In this case, what it has revealed is that these letters and this rectangle are not truly connected.

What I have done instead is place white fills over the blue lines in my design that I do not want cut out – which unfortunately would not have worked. When it comes to cutting lines and vector engraving lines, the laser cutter will cut or engrave them anywhere they are present in the design – even if they are covered by something else. The white fills I placed over these cutting lines would be ignored, and the lines underneath them would still be cut.

So let’s combine these shapes correctly.

The first thing we do is select all of the shapes we want to combine together. We then use the Path > Combine command – which combines these shapes into a single unit.

Finally, we use the Path > Union command to turn all of these separate shapes into a single path running around the outside of them, and to remove all the lines which would otherwise separate them.

Now when we change to View > Display Mode > Outline, we can see that these letters and the rectangle below are truly a single vector object. Once again, this a true representation of what will be laser cut – and this time it’s what we want.

Let’s go through this process one last time. We’ll open a new Ponoko template – and create a collection of overlapping shapes which are formatted for laser cutting with Ponoko…

So now we have something vaguely arty – let’s turn it into a single object for laser cutting. First, we’ll select all the shapes that we’ve laid over each other. Now we use the Path > Combine command, followed by the Path > Union command.

All of these shapes have now been combined into a single object ready for laser cutting with Ponoko. We’ll do a final double check by using the View > Display Mode > Outline command, and it’s definitely correct.

So that’s all there is to it. I hope this technique might be helpful to you in the future – for making new exciting projects with Ponoko.

Thanks!

How to reduce burn marks on acrylic

$
0
0

Or how to avoid “smudgy yuckyBurn marks are an inherent part of the laser cutting process – we are cutting things with a highly focused beam of fire after all. There are some tricks to minimizing this issue for different materials, and this post deals with acrylic.

Most of the acrylic sheets we use come with protective paper on both sides. It’s possible for us to leave this paper on when making your design, which we tend to do where it will not interfere with your engraving. The main downside to this is needing to peel paper off both sides of the acrylic, which can be time consuming and tricky if your design is intricate.

Generally our rule is: cut with paper on both sides if there is no raster engraving in the design, or if all raster engraving is of the heavy variety. Heavy raster engraving burns through the paper without any trouble, as does heavy and medium vector engraving. If the file has medium or light raster engraving, however, we will remove the protective paper from the top of the material unless otherwise requested.

It is possible to use medium engraving through the paper, but due to the dot matrix nature of the raster engraving not all the paper is burned away. A slightly sticky residue may be left on the plastic if you ask for this option – which may need to be cleaned off before you use it.

Below are some typical examples of what you get when laser cutting acrylic. It should be noted that it is most obvious on black hence using it as the example material. Also the images have been zoomed in to great detail and emphasizes the effects more than might be obvious to the naked eye.

Cutting – Paper Left On vs Paper Removed
On the left through the paper and on the right without paper. The right shows a clear example of the smudgy burn marks that are left on the acrylic after cutting. Clearly the shapes cut through the paper is cleaner than not.

Heavy Raster Engraving – Paper Left On vs Paper RemovedOn the left through the paper and on the right without paper. You can see that engraving through the paper produces a crisper result. The vaporized acrylic builds up around the outside of the letters when the paper is not use and produces this slightly ‘inflated’ look. This would probably polish off should you have the desire to do so.

Medium Raster Engraving – Paper Left On vs Paper Removed

On the left through the paper and on the right without paper. Again engraving through the paper is a little crisper in the letter forms, but as mentioned earlier there may be sticky residue left over from the adhesive of the paper.

So what does all this mean?

If you want us to leave the paper on, you should only use heavy raster engraving. If you use medium or light raster engraving, we will make your design with the paper removed.

If you would like to specify how you want your job cut, make a note in the Special Shipping instructions.

Other tips for engraving & cleaning acrylic:
How to improve your engraving results – Part 1
How to improve your engraving results – Part 2
Tips for cleaning acrylic

Kudos to @deleifd and @skruff for the awesome type design.

‘Clean Up’ your paths in Illustrator & upload easier

$
0
0

Remove hidden problems in an instant.

This short post will show you how to avoid one of the most common design file problems Ponoko creators encounter. The image above shows two halves of the same file, viewed in two ways.

In View > Preview mode it appears fine, with all of the visible elements formatted correctly. In View > Outline mode, however, suddenly we can see a number of hidden points – which appear as Xs.


What they are

These Xs are leftover points, or ‘anchors’ from lines removed from the design. These points are created every time you add a new line or shape into your design – in each corner or line end. In Illustrator particularly, it is then possible to delete the line between points without deleting the points themselves.

This can become a real problem if the line you were working with was not formatted correctly yet – as these invisible points are still in your design, and will trigger an error when you try to upload your file to Ponoko.


How to remove them

All you need is a single easy command: Object > Path > Clean Up…

Which will provide you with this pop-up box: Click ‘OK’ and all of the stray points leftover in your design will be removed. As you’ll see from the pop-up box, this command will also remove any empty text fields, or any shapes with no fill or stroke color.

And the result? A nice clean file all ready for uploading and making with Ponoko. Here’s the one we started with in Outline mode, after the Clean Up command was used: So next time you’ve got a design ready to upload to Ponoko, take a moment to use the Clean Up command, and upload with confidence!

How Detailed is too Detailed?

$
0
0

Getting superb results from thin plywood and bamboo.

Every now and then we come across P3 design files that are so densely populated with designs that we marvel at the super efficient use of space.  It is fantastic cutting something that will generate minimal waste. However, there can be a downside to adding so much detail onto a large sheet.

Sometimes a sheet of material may not be very flat when we get it from the manufacturer. This is seen most commonly in 2.7mm/0.106″ bamboo, 5mm bamboo (NZ) and other thin plywood. Unfortunately this is the nature of material. The inherent tension in the grain of the wood and the way it is constructed means the panels can warp between the factory they were made in and the Ponoko shop.

Additionally, dense cutting and engraving generates heat build up, which can cause the sheet of material to warp during cutting. This can adversely affect the quality of the cutting, engraving and has the potential to damage the machine. This is most apparent on thin materials like leather, styrene and bamboo.

So why is warping so detrimental to cut quality?

The laser is set up to cut flat sheets of material. Before each job it is focused to to the top of the material for a given thickness.  For example, if a sheet of 3mm/0.118″ acrylic is being cut, the laser been is set to focus on that thickness. If a sheet of 9mm/0.354″ MDF is cut afterwards, the beam needs to be refocused to accommodate the extra thickness.

The laser can handle variations in focus of +/-2.5mm. Once it gets outside this the laser beam becomes wider (less focused) and this results in a thicker cutting line and ill-defined engraving.

Here is an example:This is a side view of 2.7mm/0.106″ bamboo ply P3 on the laser bed, and as you can see, it’s not very flat, as often happens with thin plywood and bamboo.  This sheet is to be cut into 1xP2 and 4xP1.

The numbers show the order in which the cuts were made.You can see that cut 3 is thinner and nicer (because it is more in focus) than 1.  Why?  Because when the sheet got cut in half (cut 2) it was a lot flatter for cut 3.

So how does this affect you?

Sometimes we need to pre-cut the material into smaller pieces to minimize the warping and produce better quality results. If you have a plywood P3 packed with detailed designs, especially ones that have engraving, there are a couple of options at your disposal to get the best results.

One option is arranging your designs on smaller material sizes, like the P1.  It might mean paying a slightly more for the materials, but you will end up with consistent, quality results. This is a great option if you have multiple small, jewelry like items.

Another option is creating channels of space that can accommodate additional cutting lines. Unfortunately, this means that you will be sacrificing a little design space, and producing a tiny bit more waste, but this modest compromise will ensure a higher degree of awesomeness in your products. This might be a good way to go if you have bigger more irregular objects that don’t quite fit on a P1.

Here’s what we are talking about.  The example below is too dense to cut into smaller pieces.

Whereas this example shows room for us to pre-cut the material to flatten it.

So if you are into hardcore detail, give your designs some breathing room and take a step closer to laser cutting perfection when working with thin plywood and bamboo.

If you are unsure about how to layout your designs, contact us, we are always happy to assist with advice.


Ins and Outs of Holes

$
0
0

How to determine placement and size of jump rings when laser cutting jewellery.

madebydan

Making jewellery is incredibly popular among Ponoko users.  It’s an excellent way to get a feel for laser cutting and try out a range of materials.  Popular rigid materials include plywood, acrylic, veneer mdf, bamboo, metals; while leather and felt are commonly used soft materials.

Much of the jewellery is based on 2D shapes, so minimal prototyping is required to get the optimum result in final product.  However, there are still a few problems that jewellery makers run into.  Many of those are the result of not considering how other components or findings, such as jump rings, clasps, pins, etc will be attached.  The other contributing factor is material durability.  You have to use enough material to avoid breakage.

chromatophobic

If you are wanting to attach a chain to your jewellery, you need to cut a hole somewhere in the shape for the jump ring that will hold the chain.  But where should the hole be placed, and how big does it need to be?  These are determined by the combination of material thickness and overall design.  Your design and material choice dictate the size of hole and size of jump ring to be used.

You need to leave enough material around the hole for it not to break, so it’s worthwhile checking Test Cuts photos in materials catalogue to get an idea of how finely you can cut the material.  However, if the hole is too far inside the design it will not only compromise the aesthetic, but get in the way of the jump ring.

Material thickness Recommended hole diameter Recommended jump ring size
3.0mm / 0.118in 2mm / 0.079in 5mm / 0.197in
4.0mm / 0.157in 2.5mm / 0.098in 7mm / 0.280in
5.0mm / 0.197in 2.5mm / 0.098in 9mm / 0.354in
7.0mm / 0.280in 3mm / 0.118in 11mm / 0.433in

If you’re unsure whether your hole placement is functional, you can quickly draw a 1:1 cross-section of your material with different size holes and position your jump ring over the image to check the fit.  The diagram below is an example. For example, you can see that this figure illustrates how a 2mm hole in a 7mm thick material is too narrow for a jump ring to fit through.

Sometimes a circular hole just doesn’t work with the design, but don’t let it stop you.  Instead, you can make the hole follow the contours of the design, which is more considered, or better yet, make it an integral design feature.

chromatophobic, Anna Corpron

Add Colour to Your Laser Cut Detail

$
0
0

Paint filling and masking laser engraved parts.

Painting in engraved detail gives your design an additional unique factor and makes less likely to scream “I’m laser cut!”  In the old days of hand cutting materials, you would have to sit there for hours, carefully applying masking tape of fluid in strategic areas to ensure a crisp paint edge.  Like trying to paint straight stripes on a wall, only on much smaller scale.

Fortunately, should you choose to try paint filling your laser cut engraving, your can mask required areas with laser cut precision.  The acrylics are cut with protective paper on, and all engraved areas are ready to be painted.  Other materials can have transfer tape applied to top surface on request.  The exceptions to this are leather and felt because transfer tape does not stick well to those.  Some woods can present the same problem also, so experimentation is always advised.  Protective paper and transfer tape are not the same thing.  Protective paper is the brown film on both sides of acrylic sheets and is applied at point of manufacture, which means that, by default, all our stocked acrylic has protective paper on both sides.  Transfer tape is the light-coloured adhesive sheet that is stuck on to keep all the parts in place when the cut design is removed from the lasercutter.

Transfer tape over white acrylic, over bamboo ply

There are two main factors in this process: digital, which is your design; and physical, which is the actual painting.

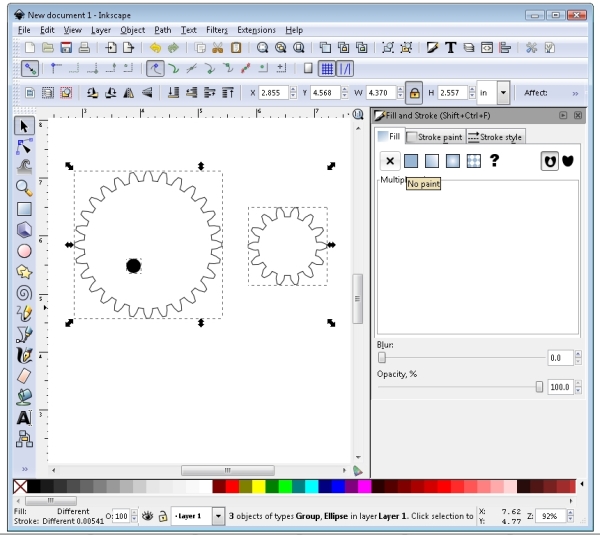
Let’s start with the digital.  Whether you’re using a raster fill or vector engraving, you need to use the heavy lines/fills, which you can also read about here.  A vector outline around your raster fill will also give a crisper edge, which works well on larger, less detailed areas.  Small details end up too cluttered, and the extra engraving time adds to the making cost.

Vector outline on the right, and how it comes out (after painting)  on white acrylic and Eurolite

You can see that there’s some paint bleeding on the plywood resulting from insufficient adherence of transfer tape to wood surface.  Don’s say we didn’t warn you!

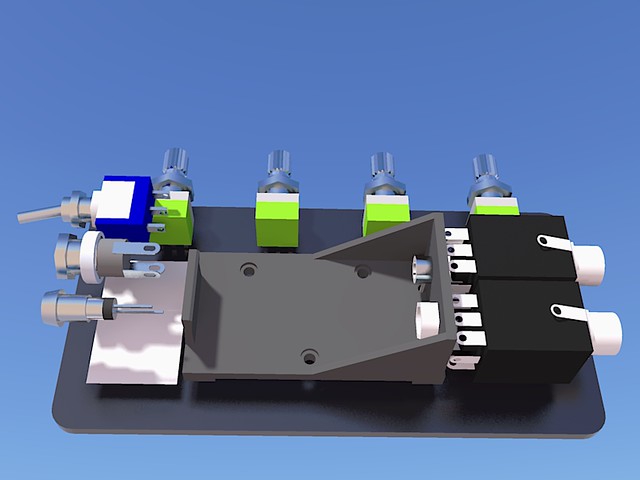
If you’re using vector engraving only, experiment with doubling or even tripling your lines to make the detail more obvious, like in the Sammich Midi boxes

Top to bottom: raster fill, raster fill with vector outline, single vector outline, multiple vector outline created using the “expand” command.  Left to right: file, Eurolite, white acrylic

At this point you will upload your file and enthusiastically wait for your “another exciting shipment from Ponoko” with all its Yippee! goodness.

The real work begins once you open you package.  Firstly, very very carefully peel the transfer tape off the top of the sheet.  Now if this is acrylic, it should be pretty straight forward because the protective paper is stuck firmly to the material, and there is little risk of it lifting off.  If the material is anything else, i.e. it is protected by transfer tape, you need to peel off the top layer with caution, as not to raise off the masking layer.

Once the transfer tape is off, vector engraving is ready to be filled in.  Use a blower brush to get rid of the residue from raster engraving first.   You can either use Indian ink or spray paint.

This is how you do it with a paint brush:

If your engraving is detailed and close to the edge, do no spray directly out of a can, as it will result in overspray.  Options in this case are ink with a fine brush, or you can spray a little bit of paint into the lid and dip your brush into that.  Usual spray painting safety rules apply.

Middle shows overspay from using spray paint.  Ink and brush are best for small, detailed designs

This is how you spray paint your engraving:

You can safely use spray paint if your engraving is limited to centre of the sheet, the edges of which can be easily masked.

The next step is waiting for the paint/ink to dry, and then you can gleefully spend hours grinding down your nails as you peel off all the tiny bits of paper.  Good luck!


This is a broad topic with lots of ifs and buts, so post your questions in the comments section, and we’ll use them for more blog posts dealing with the specifics.

Isometric Drawing in Inkscape

$
0
0

guest tutorial from Edgar Castelo

Isometric perspective is a way to illustrate 3D objects using the object’s exact dimensions. It’s different from true perspective, because in true perspective things look smaller/shorter with distance.

Although you probably wouldn’t send in an isometric file in for digital making, it’s a great technique for technical renderings of your 3D designs.

Ponoko fan and avid Facebook “liker”, Edgar Castelo, created a tutorial for doing isometric drawing with Inkscape and has given us permission to share it on the blog. Although this tutorial uses Inkscape, it works well for any vector software. ::

Let’s pretend we want to figure this piece, with text, and a hole:

As you want to place the object, you Skew it, with various angles, here, it’s -30º;

Then you want to know if your picturing a transparent or opaque piece.
Transparent, you just make all lines visible, but if it’s opaque, you just want to see the visible ones.
So Fill the object, 255, 255, 255, (white), in this case.
Remember to put the text in the first, upper layer.
As for the hole, you got to make that part, non-existent, by doing Path>Difference:

And now for some Magic, an operation called Motion.
Here’s the thing, with some edges to be worked out, but you have the makings of an Isometric Drawing, here:

As for how to figure out the values for the object’s orientation in space, here’s a chart for them:

Here’s the angles for a front facing solid:

And, finaly all other Object orientations:

Notice the wrong lines, on some solids?
You just have to select the “face” that should be up front, and push that face to the top level.

A Precise Fit With Ponoko

$
0
0

Inkscape Instructable to help your 2d designs fit just right

Carol Wang is nutty about knots, and she’s also untangled the mysteries of laser cutting with this fantastic feature on Instructables.

In a handy companion to our own article on the same topic, Carol runs through a series of tests that help determine how to achieve snug fits in acrylic, particularly when combining different colours that interlock.

Not only will it help your 2d designs come out the way you want them to; you’ll also save money and time by ensuring all your measurements are right before making the first cut.

There’s no need to get yourself in a knot over tolerances…

Read the full breakdown from Carol on Instructables

Ponoko Project Guides

$
0
0

Free resource for running a design project with Ponoko.  Design, educate, inspire.

Are you a student wanting to design and make a something real? Are you an educator looking for an engaging project that will inspire your students to explore new technologies and create tangible products? 

Well, here at Ponoko we have created Project Guides – a super-useful step by step resource for structuring a design course or a project using the Ponoko system. 

Amongst other features, the Project Guides cover the possibilities of laser cutting, material suggestions, file formatting, costs and timeframes.   

We’ve also included some fantastic case examples from various institutions that have used Ponoko for design courses.

The Project Guides are suitable for any level of design education. After all, if you can use a computer, you can make with Ponoko.

Download the Project Guides and unleash some serious inspiration!

Tutorial: using repeat patterns for laser etching

$
0
0

Add some pattern to your lasercut designs

Ponoko’s Josh Reuss has put together another quick tutorial that’s fun, easy, and a great way to jazz up your lasercut designs.

Josh walks you through using Adobe Illustrator and free pattern packs to create a design file that will have the patterned parts laser-etched.

Check out the tutorial and start etching patterns on your Personal Factory made products.

Tutorial: how to design a laser-cut enclosure for your DIY electronics

$
0
0

A case design case study

I’ve just written up a step-by-step tutorial detailing the process of designing an electronics enclosure from concept to completion. It covers circuit design and layout, laser-cut construction techniques, and little extras like accounting for kerf and dog-boning corners to reduce stress.

Be sure to send any questions my way, and I’ll do my best to answer them on the forum.

For some awesome examples of this kinda thing, check out this blog post on custom, laser-cut enclosures created by Ponoko customers.


The finishing touch: filled laser engraving tutorial

$
0
0

A simple technique for making your laser engraving stand out
Rich Decibels Exenterator
This week I finished a project I’ve been developing for a while: the Rich Decibels Exenterator. Sound samples and technical details and so on are available on my blog but for this post I just wanted to demonstrate my engraving-filling technique. For me it is the ideal way to add labels to my DIY electronics gadgets.

Check out the full step-by-step tutorial on the forum.

Tutorial: Guide to optimising lines for laser cutting

$
0
0

Optimise your files before uploading to save laser cutting time and money

optimising laser cut files

Ponoko’s recent prototyping party reminded me how important effective nesting parts in laser cut files is. This guide is about optimising line work to achieve faster cuts and thereby saving money. Cutting time is generally the most expensive component when ordering from Ponoko. In the forums recently, people shared their methods of saving money, but I think nesting line work requires greater exploration…


David is an industrial designer from New Zealand. He contributes a weekly article on personal fabrication for Ponoko. You can follow him on Twitter @dizymac

Awesome laser cut bendy corners

$
0
0

Laser cutting technique for bending plywood

I’m a big fan of UK open-source & DIY company oomlout. I used their work as the basis of my laser cut project box design tutorial back in August.

They’re back again with a new construction technique that I can’t wait to try out. By simply creating a series of alternating slots in a length of plywood, it is possible to create flexible flowing curves: something that has always been challenging with the two-dimensional nature of laser cutting. They have provided their design files in a wide range of different formats so you can start experimenting with curves in your next laser cut project.

NEW material: laser-cuttable cardstock in 3 colors!

$
0
0

cardstock comes to Ponoko US = a whole new range of things to make!

Awhile back we gave our most frequent customers the chance to tell us what new material they wanted to see in the Ponoko materials catalog, and we promised to add the top two materials by the end of the year.

We brought on matte black silicone rubber last month, and today we’re announcing CARDSTOCK!

We even let our top users vote on what colors they most wanted, so we’ve got black, ivory, and red.

The cardstock laser engraves really well. It looks awesome, to be honest. And one trick you can do is use a medium vector engraving line to create perfect fold lines. Because it’s paper, its 100% recyclable and can be easily joined with glue or tape.

And you can buy a sample of our new cardstock materials for $2.50 each.

Introducing cardstock to the materials catalog also opens up the potential for a whole new range of products you can make.

To give you some inspiration and ideas, here are some examples of beautiful stuff made with lasercut cardstock.

Note: the products you are about to see were not made with Ponoko and weren’t made using our cardstock. Because, ya know, we just now added cardstock. But we wanted to show you the kinds of things that are now possible. : )

Nando Costa recently released this trippy 2012 lasercut calendar.

Stellavie designs decorative artworks and gorgeous lasercut lampshades.

Saloukee creates exquisite paper jewelry pieces.

Check out these fantastic favor boxes KatBlu Studio.

Cutture of London creates an endless array of custom stationery and ready-to-buy greeting cards.

6 resources to get you started on a lasercut cardboard project

$
0
0

rocketships, sliceforms, perfect packaging, and file optimization

We’re throwing our second Prototyping Party and giving away FREE cardboard for the rest of the month when you make something with Ponoko.

To give you some design ideas we put together a post of 20 inspirational designs made from cardboard.

With just two a little over two weeks left on this promotion, it’s time to get down to business. So here are 6 resources to get you started.

1. Josh’s Rocketship


Our community support saint Josh Judkins designed this cardboard rocketship in Adobe Illustrator and then lasercut it in 4mm single layer cardboard.

If you’re new to digital making with Ponoko AND new to Adobe Illustrator, I would really encourage you to try making this pre-designed file.

It will give you a feel for what a design file should look like, an introduction to using Ponoko, and most importantly you’ll get to see how awesome it is to get a physical thing in the mail from something that started as a computer file. Download the Cardboard Rocketship for free here and give it a whirl.


2. 7 tips on optimizing your design file for lower costs

We asked our in-house masters of digital making to share their tips for optimizing a design file to result in the lowest possible costs. Read what Josh J, Dan, Catherine, Yana, and Josh R. have to say about optimizing files for lasercutting.


3. A guide to lasercut line optimization


Ponoko blogger and maker David McGahan puts those optimization tips into action with this excellent demonstration of how to set up your design file for much lower costs. His example saved him around 40% in making costs.


4. Packing products beautifully and on a budget


If you think you don’t have a use for cardboard, think about using it as a great way to package your products.

With lasercutting, you can create perfectly fitting packaging inserts to hold your product designs — as shown in this post about packing your products attractively and inexpensively.


5. A package design that needs no glue


Designing your own package can be tricky; there’s a lot to consider. Learn from Yana as she walks you through the making of this package design meant to effectively protect a jar of delicious jam.


6. Creating lasercut 3D forms with slice form software


The easiest way to turn flat pieces like lasercut cardboard into 3D shapes is to use slice forms. By layering your pieces you can create space and depth and 3D shapes.

And guess what? There’s software that will create the slice forms for you. This Ponoko forum post talks about two plugins for SketchUp. There’s also Autodesk 123D, available in the Ponoko App Gateway. It was used to create this crazy hand bowl.


Now that you’ve got some know-how, take a look at this roundup of 20 inspirational designs made from cardboard.

Viewing all 82 articles
Browse latest View live